I'm back.....and I've got a project I'm working on.
It's been along time coming. I've been busy... and honestly just don't play enough to make these things a priority.
I picked up a bartop cabinet from Rick @ Gameroom Designs.
Rick is awesome! You can check out his site here : http://gameroomdesigns.ca/
I picked up the "contender" model of Rick's bartop kit.
This thing is awesome, it will look soooo good in my Nintend-ROW.
(that's what I call my row of Nintendo cabinets in my man cave.)
The bartop cabinet is actually modeled after a Nintendo cabinet, just smaller.
I'll post a pick later to illustrate the scale of the cabinet.
For this project I'm trying something new.
The cabinet will be finished in black and I'm going with a "Punch-Out" theme.
I got the artwork printed up locally and with the help of some awesome members
over on the BYOAC site I have some great custom artwork.
I'll be using a Raspberry Pi 2 for the brains of the unit.
I've never gone the Raspberry Pi route, but the fact that you can download the image online eliminates a ton of work. All I need to do is move over my ROM files and some minimal set up.
I'll be using my BLOG to post progress pics of the project and track the spending.
I'll post links when applicable.
Hopefully this will be a fun read.
Thanks all.
Showing posts with label mame. Show all posts
Showing posts with label mame. Show all posts
Tuesday, November 22, 2016
Tuesday, April 28, 2009
Monitor Issues
When I had my three Sony PVM monitors delivered I was so excited. Right away I had gone downstairs with my PC under my arm and completed control panel in the other hand. I cleared a spot on the floor and began putting everything together. As said all over the net it's best to make sure everything works together prior to doing the install. These new 25" monitors would be a huge step up from the 19" CRT I was going to use. Not only is bigger better, but it would be identical in size to the monitor removed from the cabinet. So I cleared a spot on the basement floor, hooked up the PC and some speakers to back of the monitor. Next step was making sure my new video card was installed correctly, and hooking up my control panel to the IPAC.
With all said and done I fired everything up, there were a few configuration issues. The video card had two display options, 800 x 600 (I think) and something else. I had to fiddle with this to make sure the entire screen was filled. The text on screen was also very difficult to read. These Sony monitors were/are? considered good monitors, they are meant for professional studio use. However with age and changes in technology they pale in comparison to today's monitors. Perhaps a combination of things, I'm unsure, but the picture needed work.
I had to make a couple of changes to get things the way I liked.
The resolution of the video card had to be adjusted.
To make the text readable I had to adjust the font size in MAME.
The same was required for Windows, much of the text on screen was not readable.
When these few steps were taking I could clearly see what game is was selecting, and able to read easily my on screen options. Now came time to adjust the monitor itself. It had a very "green" look to it. The Sony PVM monitors have a "reset" button on the front control panel. There is also an option for GREEN or PURPLE, DARKNESS, and I believe HUE. Each option has a + and - button used to get the desired effect. Sadly all the options on the left of my monitor don't work! The RESET doest do anything, and any adjustment that requires you to press "+" doesn't work.
Sadly this monitor (1 of 3) has been of no use to myself. I have it up for sale on the local Kijiji for $75. (What I paid) I'm in the process of trying to de-case the monitor. The guys over at the Build Your Own Arcade forums have provided some great advice. I might be able to swap out the defective part with a part from another working monitor. Make the required adjustments and then swap the part back into place. Once I have the desired look the monitor would remain stationary in the arcade cabinet, so constant adjustments would not be required. Its a great idea, perhaps a little out of my range...but as is the monitor is money wasted. So why not try to learn something and try to salvage it ?
When I discovered the one monitor wasn't working as I had hoped I went outside to the garage and began the "not so pleasant" task of hauling the remaining two 110lb monitors into the basement. Sadly by having the monitors delivered (saving me about a 2 or 3 hour round trip) I had purchased them sight unseen.....UNTESTED! I wanted to make %100 sure that this problem was exclusive to only the one monitor....It was!
I'm happy to say the other two monitors work flawlessly, they can be read clearly and easily. MAME looks great on them, the size is perfect and the colors vivid. I am very happy with the overall results.
I've decided to hang onto my 19" CRT in the event that I MAME a cocktail cabinet in the near future. The other two Sony PVM's will also remain with me. I figure worst case I will keep the broken one to source parts from, the other can be used for future projects or made available to my brother & friend whomever does a MAME project first.
Saturday, December 13, 2008
Me, The iPod & The IPAC


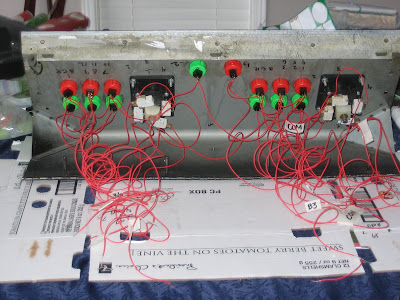


So last night was one of those nights I decided there was going to be no TV. I would clean,read,surf the net,whatever...just not watch TV. So once I got home I cleaned my dogs kennel,took her for a walk,then went online for a bit. When I was done I went downstairs and gazed at my control panel. I decided enough was enough, I didn't need to wait until my vacation to complete my MAME project. So I took the control panel up to the kitchen (so I could watch the dog) and fired up some tunes on the iPod and away I went. I first had to clean off some of the cherry switches, making sure I could see the hole and run the wire through it. In then installed the remaining cherry switches on the control panel. Slowly but surely I started to wire up all the components. As I did I was sure to label each wire, making sure my commons (ground), buttons, and all directions were clearly visible. I figured this would help speed things up when I was ready to connect the IPAC. I still have to complete player two,but I don't think it will take more then an hour on Sunday. Today (Saturday) there is just far to much other stuff to do. But I must say I'm glad I made some progress. As I mentioned prior I now have my XP computer set up to boot right into MAME. Ive made sure that MAME runs in full screen and the mouse cursor inst visible. Ill need to spend a little time online trying to figure out where my favorites folder vanished to. This is a real sticking point for me! It was so great to have all my favorites "streamlined" and displayed in one location. Ah well more on that as it develops. As always Ive included pictures with my post.
Sunday, June 15, 2008
The final four


I was having a little trouble with the buttons for player two. Four of them didn't want to leave home. I decided at that point to remove the control panel and work with it on the floor. I dint know that it was a major help, but I managed to get all the buttons off. I then removed the metal brackets on the side (they keep the control panel locked in place) I also separated the plexi from the control panel. Once all that was done I started to remove the overlay. This has proven to be a major pain, and will be another thing that requires major "sweat equity." I purchased some goo gone and left it on for about 10 minutes. But this glue just doesn't want to move. Sat I was involved in a car accident with my wife, we are both OK, but we are in pain. So for now the project will need to take a back seat. Ill search the web for ideas of removing the remaining glue.
Subscribe to:
Posts (Atom)
