Thursday, December 25, 2008
Whats Left ?
So with the controls done and out of the way my MAME project is nearing completion.
It seems every so often you have a plan and it never pans out the way it should. The plan for me was use the 19" CRT monitor that I have sitting around in my arcade project. It was small and a 25"-27" is more true with what was contained in the cabinet when I got it. I didn't have the TV and the video card I used provided me with less then stellar results. Then my dad tells me he has that 25"-27" RCA I could have. That was a major plus,but as is my PC doesn't have a means to send the picture to a TV. Then there was the issue that some games don't play on my MAME machine. From what Ive seen in my testing Midway games (NARC,NBA Jam,NFL Blitz,Mortal Kombat)don't play at full speed. One of the guys over at www.cgcc.ca said I should try FAST MAME. Now ....... I'm a guy who thinks "If it ain't broke don't fix it!." That's the way I feel about my existing system. I have the controls working well, a bunch of my favorite fighting games seem to play fine, why should I mess with that ? So that got me thinking, Id like to do a bar top MAME or even a cocktail MAME in the near future. So why don't I pick up a new PC, add a video card with S-Video out and try FAST MAME ? I decided I would try that. I'm not in the process of trying to get another PC to do a second full MAME install. But then another issue, I just picked up a 50" Panasonic Plasma TV on boxing day. I think id love to use the plasma as a monitor, and use the new/old PC as a means to stream movies and free online PPV. Ah the struggles, what do I do, what do I do ? For now no answer.
DONE! Well Almost . . .
OK remember I said I would be done the MAME cabinet for January ? Well I'm still working with that as my deadline. I've completed the wiring of the IPAC and everything "seems" to work fine. Ive been testing games every now and again in MAME.... but I find I keep going back to Street Fighter II: Rainbow .....
When I'm not playing SFII:Rainbow I'm making sure that everything functions the way it should. The computer boots up and goes right into MAME. Once in MAME the mouse inst visible and games can be selected using the joystick. Using the joystick you are able to select from Mike's Favorites and All Games. All buttons and directions work flawlessly. It was suggested I make sure the controls work before installing them into the cabinet. I don't think I've overlooked anything,but if I have it will just need to be resolved once installed in the cabinet. I'm still waiting on the PCB mounting feet that B1 (over @ www.cgcc.ca) sent me. Once they come ill install the controls into the cabinet. Today is Christmas and despite going to my parents I didn't pick up the RCA TV. I had planned to get that today and use that for the MAME monitor. We never did move around the big screens as planned so I'm still using the 19" CRT (for now).
Final Instruction Cards
Not much to say here, these are the final two instruction cards I've created for the MAME cabinet. These should simplify things for "any" user of the MAME cabinet. Even serving as a reminder to myself in the event that I forget what I am doing after a few Corona's.
Please feel free to leave comments.
Thursday, December 18, 2008
Revised Instruction Card
Instruction Cards
So I've finished wiring up the IPAC and it was tested for a short period last night. But more on that later. I'm still new to MAME so I found myself constantly referring back to a print out I created so I would know how to navigate MAME. For example, I had tested Street Fighter II rainbow and wanted to return to the main menu. How do I do this using the IPAC ? Anyway its not hard, just wasn't possible for me to memorize during the short game play I had. So it got me thinking, if I go with the 19" monitor I had planned I will have tons of negative space on the bezel. The solution was to design some instruction cards that I could get custom printed. I could even go with a simple 5'x7' design and print at a local Wal-Mart. I had been thinking of ordering a Dynamo logo sticker to place on the top of the bezel anyway, these "instruction cards" would provide more visual interest.
I want my MAME machine to be very user friendly, something that when people come over they can power on and play. I don't want anyone to come get me because they are done playing Tetris and now want to play Pac-Man. That's why I think the idea for the "instruction card" is great. Players will now know how to switch games, add credits, pause the system, etc.
I plan on designing a second card that will tell users what can be found in my favorites (not title for title, but pointing out that it contains titles hand picked by myself) and instruct them on how to get to "all games." This way if a player is unable to locate a game of his/her choice in my favorites they will have a general idea of how to locate it.
That's it for now! Ill post pics later of my completed IPAC and me testing it.
Wednesday, December 17, 2008
Start Me Up!
So once again progress is being made and my MAME project is once again the subject of my affection. I guess like many things out of sight out of mind perhaps. Tucked away in the basement with many other things on the roster MAME simply became forgotten. Well perhaps not forgotten, as it bothered me to leave the machine uncared for as long as it was. None the less I'm back in the game!
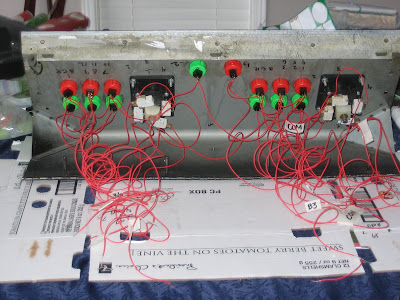
As I mentioned in the previous post I began wiring up the IPAC after having the microswithces/cherryswitches in my possession for about 2 months. I haven't completed it as of yet,but its getting there. I still need to wire up player one into the IPAC and wire up the 1 and 2 player start buttons. That's it! when that's done its DONE.
From there I can take my control panel upstairs and make sure it works the way it should. Make sure all the buttons fire, and the directions work. I also need to make sure I'm happy with the overall function. The IPAC can be reprogrammed, but as mention on the Ultimarc site it does perform shifted functions. Simply put it should be able to perform all the required commands without any need to reprogram. For your reference the link is below.
http://www.ultimarc.com/
The MAME Mystery
I wanted to make sure that my MAME project would be simple to use. Not only for myself, but anyone that wanted to play. With the mouse and keyboard tucked away it had to boot up and go right into MAME. Everything needs to be controlled from the joysticks and buttons. I thought this was a must! I had even read that you could change the BIOS(?) and even remove Windows load screens. I didn't want to get that elaborate,but I knew %100 that my machine needed to boot right into MAME. After doing a little research I found out its a rather simple process.
(1) Locate your main MAME folder & create a shortcut of the EXE file
(2) Take the EXE file and deposit it into your start up
(3) Run msconfig and make sure you see the EXE file
With all that done your PC should fire up and MAME should start without any prompting. Now what I did......... well I took the EXE file and removed it entirely from the MAME folder. I then put the EXE into my start up. MAME did start up as I wanted,but my settings and favorites were gone. I couldn't for the life of me figure out what had happened. I was trying to create new INI files, but my favorites were still M.I.A! Anyway I had asked around and figured out that by removing the EXE file I had perhaps created a duplicate MAME install. I removed the EXE leaving behind the shortcut and everything now works the way it should.
When my PC turns on it takes about 30 seconds of so before MAME itself appears on screen. To provided a more true "arcade look" I plan on removing all the icons from my desktop. Having my desktop appear clean and free of anything that would identify it as a PC. Ill then create a custom DTI (desktop image) featuring the MAME logo that states "please wait while loading." Again it serves no function,but I think it will look good and let new players realize they need to wait before playing.
Saturday, December 13, 2008
Me, The iPod & The IPAC
So last night was one of those nights I decided there was going to be no TV. I would clean,read,surf the net,whatever...just not watch TV. So once I got home I cleaned my dogs kennel,took her for a walk,then went online for a bit. When I was done I went downstairs and gazed at my control panel. I decided enough was enough, I didn't need to wait until my vacation to complete my MAME project. So I took the control panel up to the kitchen (so I could watch the dog) and fired up some tunes on the iPod and away I went. I first had to clean off some of the cherry switches, making sure I could see the hole and run the wire through it. In then installed the remaining cherry switches on the control panel. Slowly but surely I started to wire up all the components. As I did I was sure to label each wire, making sure my commons (ground), buttons, and all directions were clearly visible. I figured this would help speed things up when I was ready to connect the IPAC. I still have to complete player two,but I don't think it will take more then an hour on Sunday. Today (Saturday) there is just far to much other stuff to do. But I must say I'm glad I made some progress. As I mentioned prior I now have my XP computer set up to boot right into MAME. Ive made sure that MAME runs in full screen and the mouse cursor inst visible. Ill need to spend a little time online trying to figure out where my favorites folder vanished to. This is a real sticking point for me! It was so great to have all my favorites "streamlined" and displayed in one location. Ah well more on that as it develops. As always Ive included pictures with my post.
Thursday, December 11, 2008
Where O' Where Did My Favorites Go ?
So my favorites folder has just vanished! I don't get it, I don't know why, its just gone. It had been awhile since I was on my XP PC, and awhile since I had used MAME. When I did use it the other day I had a couple of issues. MAME did not see any of my ROMS...in fact it saw nothing. It took me awhile to figure it out,but I did resolve the problem. Earlier in the day I had un-installed several programs from the PC, I also configured the PC so that it would boot up into MAME. I'm not sure, but I'm guessing by doing this I messed a few things up. I was able to re-point (not sure of the term) MAME to all the required folders. It now knew where to look for ROMS, marquees,saves,etc. However the folder I once created with about 200 titles I liked to call "my favorites" was missing. I was able to right click on games and send the to "my favorites" however I CANT FIND THE F**KING FOLDER ! If anyone has any ideas as to what I could do please email me : vibefx@gmail.com
A Small Victory
So I guess its fair to say that in the world of MAME not everything (or anything) goes my way. Some things still remain true to this day, time and dedication seem to escape me with ease. Its not that I'm happy about it, its just what happens.
I had set a personal goal to complete my project for December. But like many of us the holiday season is a busy one, and if time was hard to come by prior...its harder now. So with that realization kicking me in the ass I said I would be done this project for January. I have a nice chunk of time off in December and in many respects very little to do on the MAME project. It really is a shame to let it sit there doing nothing since around September. There are many days when I go home and say "I'm not watching TV today!." It doesn't seem like much,but not hitting the sofa means I get stuff done. All I need is a few days to say, "I'm not watching today today" and make my way downstairs to work on the MAME project.
So where does that leave me ? What has been done ? Whats left ?
Whats been done ?
- Taking some advice I got from the good people over a www.cgcc.ca I was able to get my PC to boot right up into MAME. It was rather simple, take the .exe file from the MAME folder itself and drop it into your start up. When your PC turns on MAME should start right away. To make sure its there type "msconfig" & look under "start up."
This worked like a charm for me! However the PC is a little slow in going into MAME, but not enough to bother me. What I will do is clean up my desktop as it is visible for a few seconds. Make sure no icons remain on the desktop, and perhaps prepare a custom background (desktop image).
- I was able to pick up a 25/27" RCA TV with a s-video input. This is great as it would better resemble what was originally in the cabinet. It also leaves me my 19" for a possible cocktail project in the future. Even a smaller classic style cabinet. The problem however is my computer doesn't have an s-video output. When I tried a "better" video card awhile ago I thought the results were in fact worse then prior.
- I'm now seeking out a new yet old/used PC to run a different build of MAME on. Again thanks to the guys over at www.cgcc.ca I got a few different versions of FASTMAME. From what I was told/read/hear it helps to speed up some games. I know I found most Midway games (Narc/NBA Jam/Mortal Kombat) ran slow using my build of MAME. This could indeed fix that problem! I don't really want to mess with what Ive done on my PC, I'm happy with the set up thus far. However I think having the second PC could be a good idea. If it works better I would simply use it vs. my other machine. I also plan on adding a "better" video card with s-video out to this PC. If it does work better and the video card does what it should I can use it in connection with the RCA TV.
Whats left ?
- Still need to install the last 4 microswitches to joystick number two. Once that's done I can being to wire up the IPAC.
- Once the controls are fully wired Ill need to begin some testing. Just want to make sure everything works how it should before making the move into the arcade cabinet.
- Add monitor supports to the interior of the cabinet. Ive decided I would add my monitor supports to the inside of the cabinet and have the bolts visible on the side. I'm not going to add the expense of side art, so the bolts wont do any harm.
- Once Ive added the monitor supports (and shelf) I can install the monitor and cut the bezel.
- Now I take everything and put it inside, cross my fingers and hope for the best !
Where does that leave me ?
- If I'm lucky it leaves me with a finished product I can begin to use and enjoy on a steady basis. It leaves me with a little know how to help my brother and friend with their MAME projects.
Thursday, November 13, 2008
December
DECEMBER ! That is the goal that I have set for myself. My MAME project will be done & playable for the month of December. Its been in the basement collection dust for about 45 days now. I cant say I'm happy about it,but that is the reality. I think part of the problem is that Ive let little things slow me down. Thanks to B1 I got the required cherry switches that I needed. But with that came the issue that I was lacking quick connects, it was suggested that from a repair stand point they would be ideal. The Source (Radio Shack) sells them,but they are slightly costly. Plus they come in mixed packaging, %50 of the contents I have no use for. Now I just figure I will attach the wire as I planned and for safety reasons use some
electrical tape to cover the connections. What good is this project if I'm not using it ? I guess sometimes despite our best efforts we are creatures of habit. And be it time with the wife,the dog,family,friends,etc etc there isn't always time for projects. I'm sure most of the guys over @ CGCC find that to be the case ! For me the "better haplh" doesn't always feel its the best use of my time. Then there are the nights where I'm tired,etc. The point being.....sometimes despite our best efforts things don't always pan out the way we plan them.
With that being said I decided to give myself a deadline. I thought to myself if I set a firm date it would give me something to strive towards. That onto itself could be the motivation I need. I have most of the elements ready to go, I know (mostly) how I want to finish off the cabinet. Really to date the sticking point has been adding on the remaining cherry switches and wiring the joysticks/buttons to the IPAC.
I think once the buttons/joysticks are wired up the testing wont take more then a day or so. Just a few bugs I need to work out and perhaps a couple of adjustments to MAME itself. The monitor itself could be a bit of a challenge. I have some wood to mount supports and will need to cut a bezel out of cardboard. I think to get the monitor at a good height could be an issue. I'm thinking simply to make a shelf, then from there I can tilt the monitor,etc.
I wont get into detail now as I will details the steps on my blog as I have been doing. I guess I really just wanted to point out the December is D-Day ! Ive got to be done for Dec.
Sunday, October 19, 2008
Inspired
Forgive me as this post might be a lil......well.....um.......all over the place.
Time isn't in abundance as of late, people these days seem to live busier lifestyles. For myself that couldn't be more true. A lady at work pointed something out to me that your days will naturally follow a path. For example, if I go to work for my shift which is 7am til 3:30pm I will get a ton of stuff done on any given day. When my shift is over I'm full of energy and I have plenty of hours before bed. If I go to work for the shift my lazy ass likes, 10am - 6:30 pm I do nothing. If on a Saturday or Sunday I decided I'm going to hit the couch........lets just say its hard to break the cycle.
On Saturday night I was watching TLC's Trading Spaces and one of the projects the designer did was a coupon book for the owner of the other house. It had coupons pertaining to a relationship she was trying to spark.
I have decided I need a coupon book like this to make use of my toys! Its not everyday the wifey will rock out a set with me on Rock Band. Even getting in a game of Bust-A-Move (her favorite) inst easy! With the help of this trusted little companion it might help me to play with some of my stuff. You know a coupon for a game or two of Foosball,etc.
My brother now has the bug for coin-op collecting,but I don't know how often he would swing by to play a few games,etc. Sadly many of my friends don't share the in the interest at all. Some of the ones that do don't drive (I know lame for 25+) or simply don't have time. In part I'm hoping when my basement is complete these "investments" will see some major use.
I will point out that even with minor use I am still happy with my purchases. Even over and above the fact that, "yes, they look cool." I have realized its not about the quantity of play that matters so much as it is the quality. I don't need to use something everyday for it to be valuable. Something I preach to the people at work who think I'm stupid for having an extensive and expensive sneaker collection. They are dumbfounded that I wear less then %50 of the collection.
Anyway rant aside, today was a me day. The wife and I played a set of Rock Band, I went downstairs fired up the Neo-Geo and played a few games of Bust-A-Move and some King of Fighters. I felt inspired to really move forward (again) with my MAME project.
I'm still hunting for a larger monitor,but until I find one am sticking with my 19".I have the wood I need to install the monitor supports. When the wiring is complete that will be the next project. I've asked my brothers (both electricians) if they can get me the quick disconnects, but I will still source out a electronics supply store on my own. Once in my possession I feel I can wire up the IPAC quickly and resume/complete my testing.
Again thanks to the guys at CGCC I was told one way to possibly get my machine to boot right up into MAME. Ive put it off for the simple reason that the computer is still in use for other reasons as of now. However rest assured when the testing is complete that will be the 1st thing I try.
As always I will post my pictures, progress, and whatever else I do for anyone to check out. I'm really enjoying the project and think my brother will end up doing something similar with his Showcase cabinet.
Monday, October 6, 2008
Off Pause
The idea is to get this MAME project back on track this weekend. Its stalled for long enough but now the cold weather is here! At a minimum id like to get the cherry switches installed, which in reality is no more then 20 minutes. If time is available id like to wire up the IPAC,but ill be happy to simply install the switches.
Tuesday, September 2, 2008
You've Got Mail !
Cherry switches are in! Thank gosh! I'm so excited!
(I know that sounds lame.)
B1 one of the good folks @ www.cgcc.ca has sent me along the cherry switches I needed to complete my arcade controls. The long weekend that just passed left me rather busy, but Id like to think this week I will get working on them. I don't expect it to take much time. Once the controls are wired to the IPAC I can begin to test them with MAME.
A little more computer configuration is needed, it would be ideal if I could get the machine to boot up right into MAME. Id like to hide the windows environment as best I can.
Friday, August 22, 2008
Cherry Switch
Thanks to B1 @ the www.cgcc.ca site I have some cherry switches on the way.
I'm very grateful to him for this. The Starburst auction is this week, but I will be unable to attend. I have a wedding to go to so no games for me! I would have liked to go to the auction, then the Playdium store for some parts.....but it just isn't in the cards. But again thanks to B1 I have the most important part I need on the way.
Upon its arrival I will wire up the joysticks and begin testing the IPAC.
thanks again !
Tuesday, August 12, 2008
Game On Pause
Really busy as of late so the MAME project has stalled again. I dont think it will be long until I resume. Im very eager and really want it completed. It suffered a few minor dings on its journey to the basemtn. None the less, thats an easy fix.
Im going to pick up some quick connects and rewire the buttons. Once thats done ill wire up the joysticks and begin testing the controls.
Saturday, August 2, 2008
The MAME Cabinet
The other day a friend of mine came over and we were able to move the MAME cabinet inside. It suffered a few little scratches and dents during its journey, but nothing that cant be fixed. It wasn't so bad moving it once gutted, it was rather easy in fact. We put it in its part time home for now. I installed the marquee light, the marquee, and the bezel that covered the monitor hardware. I also installed the drawer that once held the Marvel vs. Capcom board. I added the control panel just to see how it looks, again I'M happy with the results. If time permits this weekend id like to complete the wiring. Ive decided to just cut out the micro switches that were attached to wiring harness prior removed. I had wanted to get some new/used ones, but it didn't pan out. Once the wiring is complete ill need to move the control panel upstairs and begin my second round of testing. Make sure everything in MAME is configured the way I like it. Id also like to change my settings so the PC boots right into MAME. Ive read that you can disable the Windows load screens, but to me that's not a big deal. If I can figure it out I will, if not I'll leave it as is. The drawer that held the Jamma board has to remain in the cabinet, as the control panel attaches to it. I dint think I will be able to stand up my PC inside. However I don't see an issue resting it on its side fan side up. I need to install a small shelf of sorts to hold the sub woofer for the speakers. This will give me access to turn the volume up & down if needed. I'm going to leave the back door off to help with cooling, and simply mount the power bar on the back. Once turned on the PC will boot up, and the speakers and marquee will also turn on.
Friday, August 1, 2008
More Spending Updates
Not much has been done or purchased as of late. Just some wire and a light fixture.
As promised I will always record my spending here, and if anyone would like more info please email me.
DETAILED INFO :
Marvel vs. Capcom = $75
Cabinet Delivery = $60
IPAC = $66
Buttons = $18 (purchased an extra 6 buttons)
Paint & Rollers = $20
Varsol = $5
Spray Paint = $10
Light fixture = $15
Wire = $12
TOTAL SPENT : $281
There isn't much left (in my opinion) and I think once Ive tested the controls it should come together rather quickly. I still need to wire up the joysticks and hook everything up to the IPAC. Once that's done I can begin to test MAME, make sure it all works the way it should. If it does I can then move the computer into the cabinet itself. Hook up everything to a power bar, and start installing the monitor. That I'm guessing will be the hardest part. Ill need to figure out a way to mount the monitor, and custom cut a bezel to hide everything.
Wednesday, July 30, 2008
Control Panel Complete
I installed my Hori buttons into the control panel. Originally I had P1 with three red on top, and three green on bottom. Player 2 (P2) was three green on top, and three red on the bottom. It didn't look good, so now Ive mirrored player one, less P1 button. It seems like a little thing, but cosmetically to me it made a big deal. Ive just finished installing the joysticks, player one is red, player two is black. I'm really happy with the paint job, I think the flat black paint works well. I'm not going to install the plexi or the metal brackets that came on the control panel. I figure they were there more for security, and since the machine is for home use only they aren't needed. Thanks again to the guys @ www.cgcc.ca I figured out how to wire up my Hori buttons. I wasn't sure if it mattered which connection would serve as the common and the normally open. (it doesn't!) Anyway this weekend Id like to start and complete hooking up the buttons to the IPAC.
anyway here are the pics !
PS - Zellers sucks ! see my other blog for why
Sunday, July 27, 2008
More Control Panel Pics
Where Im At With The Control Panel
Not really much to say here, but the control panel is well underway. Its been painted and the buttons are installed. I'm hoping to get it wired to the IPAC this week. I need to find out which connection is for what. Once I solve that mystery things will really be cooking. I'm happy with the overall look, and I think its going to fit well with the overall look of the cabinet. Here are the pics !
Wednesday, July 23, 2008
Arcade Collection
Cant wait to finish my MAME project, Ive made some good strides. The idea of having everything I ever wanted in one place is so "awesome." But I think even when completed I still wont part with my collection.
The collection :
Neo Geo two slot machine w/ Bust-a-Move, Samurai Showdown II, The Art Of Fighting 2, and Fatal Fury
25" Dynamo cabinet w/ Tekken 3
25" Dynamo cabinet w/ 19" monitor for MAME
Boards :
Marvel vs. Capcom
SNK : SVC Chaos
The collection :
Neo Geo two slot machine w/ Bust-a-Move, Samurai Showdown II, The Art Of Fighting 2, and Fatal Fury
25" Dynamo cabinet w/ Tekken 3
25" Dynamo cabinet w/ 19" monitor for MAME
Boards :
Marvel vs. Capcom
SNK : SVC Chaos
Friday, July 18, 2008
Work Update
REMAINING WORK
Finish painting cabinet - Done, two coats & spray painted the bottom. Also cleaned overrun from the t moulding.
Clean,prep & paint control panel - A little more work needed. The top is almost done and ready for paint. The bottom needs a little more TLC. It should get done by the weekend, at which point I can begin wiring.
Install joysticks & buttons
Wire up controls & connect to IPAC
Test completed control panel in MAME
Install computer, light fixture, and speakers - Computer speakers have been installed
Remove computer monitor bezel and paint - Taking the bezel off was a little harder then I had thought. So I just tapes it off and painted it. It came out well.
Cut new bezel for monitor
Install computer monitor
Install marquee - I plan on getting the light fixture this weekend
Additional Spending
A little more work and a few more dollars were spent on the MAME project.
As always I like to list the detailed info on my blog.
Marvel vs. Capcom = $75
Cabinet Delivery = $60
IPAC = $66
Buttons = $18 (purchased an extra 6 buttons)
Paint & Rollers = $20
Varsol = $5 (needed this to remove the glue from control panel)
Spray Paint = $5/10 (im yet to decide if I will do a two tone control panel. For now it will be painted in flat black. But I might do the underside in a deep blue.)
Thursday, July 17, 2008
Varsol = Satisfaction
When I removed the overlay from my control panel I was shocked by how much glue was left behind. I purchased some goo gone, let it soak for about 10 minutes and began "trying" to remove the glue. It was by no means an easy task. I got smart and grabbed the wife's hair dyer, that seemed to help a bit. But even with the goo gone & hair dryer my progress was slow...real slow ! My brother-in-law suggested I use varsol, so I did.
That with my drywall putty knife (I think that's what it is) made things so much quicker. I made great progress with very little effort, and perhaps most important in very little time. The top half of the control panel is done, I just want to give it a wipe with some more varsol and a clean cloth. The bottom is about done, but towards the lower part it seems they used some different adhesive. Perhaps a contact cement of sorts ? I'm not sure,but even with the varsol it was slow to come off. Tomorrow (Friday) I'm going to take another stab at it using the hair dryer. The heat does wonders, and I think ill be able to have the control panel fully cleaned for the weekend.
It was getting dark so I don't have the newest pictures, but I should post them in about a day or so. You will be able to see I got mostly all the glue off and its ready for paint.
Sunday, July 6, 2008
Monitor Painting
I need to work on my patience,but that's another blog.
I decided I would paint my monitor bezel so it would stick out less when used in my MAME cabinet. I tried to take it apart, but it was allot more work then it was worth. I decided to tape it off and use some flat black spray paint. It turned out well, and I got no paint on the screen ! (which was great)
Only issue came when I decided to move it from the front lawn to the backyard. I thought it would cure better in the heat, but ended up making a smudge or two.
In reality you wont see that once its installed anyway, so I'm not sweating it.
The only concern I have now is that a 19" monitor is to small. There is going to be a ton of wasted space around the monitor, I really think Ill need a nice custom bezel.
When I replaced the video card to a card with a TV out the image quality went down. It would have been a huge plus if I could have had video out, as I could have hooked up an old TV. Now I will need to track down a larger CRT monitor. I don't know that ill make finding a new monitor top priority, but its definitely on the list. I'm also hoping that cutting my bezel out of poster board turns out OK. As always Ill post my results and pictures here.
You'll see the paint job is somewhat sloppy in parts. Keep in mind most of that wont be visible once contained in the MAME cabinet.
Saturday, July 5, 2008
Painting Complete
I finished painting my cabinet, and I'm quite please with the results. I'm sure it could have been better, I could have taped better, or removed the t-moulding, but all in all its good ! Its a light blue so it doesn't really translate well in the pictures. The t-moulding is black, and the control panel will be painted in a flat black paint. I was able to get a hold of an old supplier and have some Hori buttons getting delivered today. My buttons don't really go with the overall scheme of the cabinet, but I don't think they will stick out like a sore thumb. They will consist of red & green buttons. Each player will have three red & three green. Player one will be red, and player two green. In total 14 buttons are on the control panel. I wanted to add more, as I have some extra yellow Hori buttons. I have instead decided to use the shifted functions on the IPAC and save myself the work. The Hori buttons themselves should save me time as the micro switches are built in. I wont need to dissect my mess of wires that was removed from the cabinet. I think as another time saver Ill be purchasing 8 more micro switches and using them for the joystick installation. Again quite simply this will be better then taking apart the mess of wires I was left with.
If I am able to find some time today Id like to tackle the control panel. Its still a mess, and covered in adhesive. Once that is cleaned and painted I can begin to install the buttons and joysticks. Ive decided to get the control panel fully wired and test it using MAME before installing it back into the cabinet. This will allow me to make any alterations needed.
Ive reinstalled the coin door and installed my old computer speakers. Ill need to add a shelf of sorts in the back of the cabinet to rest the subwoofer. This is also handy if I need to adjust the volume.
Friday, June 27, 2008
Whats Left ? Detailed Spending
Here is a checklist of what still remains on my MAME project.
Ive also included a checklist of what the project has cost to date.
DETAILED SPENDING
Marvel vs. Capcom = $75(fully working cabinet less one microswitch)
Cabinet delivery = $60IPAC = $66( $39 + $17 shipping + $10 fees)
Buttons = $12(twelve Japanese hori buttons @ $1 each)
Paint & Rollers = $20Labour = free
TOTAL = $233 * To date I've spent about 7 hours on the cabinet. I'm sure things could have been done faster, but inexperience plays a part. The machine has been fully gutted,cleaned,and mostly painted *
REMAINING WORK
Finish painting cabinet
Clean,prep & paint control panel
Install joysticks & buttons
Wire up controls & connect to IPAC
Test completed control panel in MAME
Install computer, light fixture, and speakers
Remove computer monitor bezel and paint
Cut new bezel for monitor
Install computer monitor
Install marquee
There could be more the eludes me right now, but that is for the most part what remains.
Progress
As par for the course time has been hard to come across as of late. The MAME project is well underway, however hit somewhat of a standstill. This weekend however I plan on spending some hours alone with the machine. (Does that sound nasty ?)
Painting might even be completed today, then next of the list is remove the adhesive from the control panel. Wiring up the controls is going to be a major project for me, and I think very time consuming. Its important to get the controls completely wired and test everything before moving it into the cabinet.
If things go really well, I'll be able to remove the bezel from my monitor and paint that also. As usual my progress and pictures will be posted.
Monday, June 23, 2008
Painting, Monitor, Wiring
The MAME project is coming along well, and I'm pleased with the results thus far.
The control panel has proven to be a real challenge, and the adhesive doesn't come off easily. However when time permits I plan on getting this cleaned and ready to go. For now the cabinet has been %100 gutted, the coin door and remaining wiring have been removed. Ive taped out the front and it is now ready for paint. The two sides are done, each received two coats of paint. I used a bathroom paint I had in the house that has a semi-gloss finish to it. Its a pale (baby blue) type color. The front will receive the same treatment at some point this week. Once all the painting has been completed ill move the cabinet into the house to begin wiring and set up.
I'm leaning towards using the side art from Donkey Kong Jr. Ive sent off the files to a friend who's father can print them for me. I'm waiting on the quote, then I can decide. If I don't use that art I will make my own custom art, but want that retro feel. All the files I will be using can be found on www.localarcade.com .
The monitor will be my greatest challenge. Ill need to disassemble my computer monitor (which will be used in the MAME cabinet). Its a 19" flat screen, and all be it id like 25" it will have to do. Sadly my video card doesn't support video out, and when I replaced it with a "better" card the results were poor. I'm going to cut the bezel out of poster board. Ill remove the bezel from my monitor, center it, trace it, then cut it out. Once in place ill need to hold the monitor secure, and install a shelf. I don't think this part will be easy.
Ill post the pictures of the painted cabinet shortly.
Thursday, June 19, 2008
Prime & Paint
I have the cabinet about %90 gutted. All that remains are a few wires that I should get to on Friday. My IPAC came in today, and id like to begin wiring the controls on sat. (but I'm not sure if ill get the chance)Tomorrow I'm off to the Home Depot for some paint and accessories, I plan on completing the painting then. Id like to paint the sides of the cabinets with two coats. Ill need to tape off the front, then prime and paint that also. As mentioned I'm thinking about a second shade of blue, but might keep it simple and use what I have. It will come down to what it looks like painted with the tape removed.
Subscribe to:
Posts (Atom)